Presentation
Diagnosis
Research
Covid19
Documentation
Presentation
Diagnosis
Research
-
Detection Kits
- Strept Biotine HRP
- Strept Biotine AP
-
Polymers AP
- Human Tissues Rabbit and Mouse Antibody
- Human and mouse tissues rabbit antibody
- Human Tissues Mouse Antibody
- Human tissues human antibody
- Human tissues mouse rabbit and goat antibody
- Mouse rat and other tissues mouse antibody
- Rat and human tissues mouse antibody
- Human Tissues Goat Antibody
- Human tissues rat antibody
- Mouse and rat tissues human antibody
-
Polymers HRP
- Human Tissues Mouse and Rabbit Antibody
- Human and Rat Tissues Mouse Antibody
- Mouse and Rat Tissues Human Antibody
- Human Tissues Mouse Antibody
- Human Tissues Human Antibody
- Human and Mouse Tissues Rabbit Antibody
- Human Tissues Mouse Rabbit and Goat Antibody
- Human Tissues Goat Antibody
- Human Tissues Rat Antibody
- Mouse Rat and others Tissues Mouse Antibody
- Human Tissues Sheep Antibody
- Human Tissues Guinea Pig Antibody
- Human Tissues Armenian Hamster Antibody
- Human Tissues Chicken Antibody
- Human Tissues Syrian Hamster Antibody
-
Polymers double marquage
- Tissus Human Ac de Lapin et Souris
- Human Tissues 2 Mouse Antibody
- Human Tissues 2 Rabbit Antibody
- Human Tissues Rabbit and Goat Antibody
- Human Tissues Goat and Rat Antibody
- Human Tissues Goat and Mouse Antibody
- Human Tissues Mouse and Rat Antibody
- Mouse Tissues Rat and Mouse Antibody
- Human Tissues Rabbit and Rat Antibody
- Mouse and Rat Tissues 2 Mouse Antibody
- Mouse Tissues Rabbit and Mouse antibody
- Polymers triple marquage
- Strept Réactifs
- Tissues Control
- Chromogènes
- Dyes
- Buffers
- Blocking solutions
- Diluents
- Mounting reagents
- Enzymes
- Annex reagents
- Serums
Covid19
Documentation
Immunohistochemistry (IHC) :origin, principle, methodology and advantages
What is immunochemistry ?
IHC was first described in 1942 by Coons and al. The publication describes the antigen coloration from streptococcus bacterias performed on infected tissues with FITC conjugated antibodies.
In 1966, Nakane was the first to disclose enzymes as a detection system through IHC and optical microscopy.
The designation immunohistochemistry was created with references to both antibody and histology sciences involved in this technique.
Immunohistochemitry is a technique widely spread because it is low cost and easily achievable. It reveals the presence and localisation of a specific protein in a formalin-fixed paraffin-embedded (FFPE) tissue section.
L’immunohistochimie est une technique très répandue, car peu coûteuse et facilement réalisable. Son rôle est de démontrer la présence ou l’absence d’une protéine sur une coupe de tissue en paraffine (FFPE).
This technique requires two antibodies :
• The first one which reacts against the antigen of interest.
• The second one is linked to a polymer or an enzyme. This enzyme could be either HRP (Horse Radish Peroxidase) or AP (alkaline phosphatase).
To reveal the antigen presence, the HRP/AP specific substrate (chromogen) is added.
HRP: DAB, Emerald, AEC, Permanent HRP green…
AP: BCIP/NBT, permanent Red, Fast Red…
To optimize tissue section and cells visualization, a counter-staining can be performed.
Do immunohistochemistry suits my research project ?
Advantages:
• Low cost
• Easy to use
• Numerous FFPE samples are available
• Both tissue and cell structures are conserved
• Achievable manually and with an automated system.
Disadvantages:
• Results are difficult to measure.
• Microarray reading is not standardized.
• It is subject to human error.
Methodology : how to create an immunochemistry protocol ?
To get access to our detailed protocol, please click here.
Step 1: sample preparation• Tissue fixation
• Tissue deshydration
• Paraffin embedding
• Microtome cutting
• Slide drying
Step 2: labelling• Deparaffinization
• Tissue rehydration
• Epitopes unmasking
• Non-specific sites blocking (and if needed, endogenous biotin blocking)
• Add the primary antibody
Step 3: detection• HRP/ AP linked secondary antibody: HRP/ AP polymer
• Chromogen (DAB, AEC, Permanent Red)
• Counterstain with hematoxylin
Step 4: slide mount• Tissue deshydration
• Add xylem
• Mounting
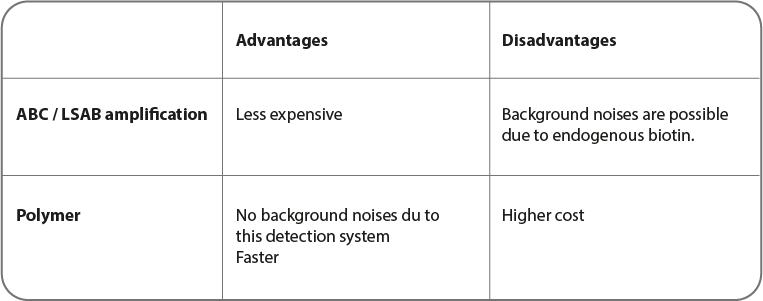
Detection: IHC techniques
Two techniques are mainly used for immunohistochemistry.
• ABC (or LSAB): Avidic or straptavidine)/ biotin complex
• The one based on polymer use
ABC and LSAB detection systems
Cette Méthode couramment utilisées pour la coloration est basée sur l'affinité élevée de l'avidine et la streptavidine pour la biotine. Le principe est que l'avidine (ou la streptavidine) réagit avec un anticorps secondaire biotynilé, ce qui produit une réaction à la peroxydase de raifort. Il faut noter que l'avidine peut poser problème à cause de sa forte liaison électrostatique due à sa charge moléculaire. La streptavidine ne présente pas ce problème, réduisant ainsi le bruit de fond.
Polymer systems
In this method, a polymer or a micro polymer is used instead of molecules described previously. Polymers are a dextran chain with enzyme-linked (HRP or AP) secondary antibodies.
Thanks to its size, micro-polymers are able to polymerize and to be directly linked to HRP and AP enzymes. To micro-polymers, the access inside tissues is easier. Therefore, antigen detection such as the nuclear proteins one is more sensitive.
This is a solution for signal amplification and a better sensitivity by reducing both non-specific bonding and background noises. On one formalin-fixed paraffin-embedded (FFPE) tissue section, detection of various antigens is possible.
IHC optimization
In order to help you optimize your results, recommendations are present for essential steps of your protocol.
Unmasking
By heating (Alias HIER for Heat-In diced Epitope Retrieval)
Unmasking buffers the most used are:
• Citrate buffer (10 mM, pH 6,0)
• EDTA buffer (1mM, pH 8,0)
• Tris-EDTA buffer (pH 9,0)
The unmasking time depends on the pH, the antigen to detect and the material chosen:
• Pressure cooker: 15 - 30 min at 120 °C
• Water-bath: 20 - 60 min at 95 °C - 98 °C.
Microwave use is not recommended, because of its lack of reproducibility.
With enzymes (Alias Protease-Induced Epitope Retrieval or PIER)
The most recommended and used enzymes are the following ones:
• Pepsine
• Pronase
• Trypsine
• Proteinase K
• Ficine
Depending on both antigen and tissue nature, incubate 10 - 20 minutes at 37 °C.
Primary antibody dilution process
The dilution rate depends on its initial concentration in order to obtain a final concentration of 1 µg/ mL.
Primary antibody incubation process can be done either at room temperature for 1 h, or overnight at 4 °C.
Depending on the diluent, the antibody will be more or less blocked.
Washing step
This step is essential, because it limits background noise by removing disturber residues.
PBS buffer containing tween at 0,2 % is mostly used. To reduce background noises, either increase tween concentration or wash with TBS.
Blocking buffers
There are many ways to block non-specific sites in order to decrease background noises.
• BSA buffer
• SmartBlockTM buffer: composed of synthetic peptides
• The blocking SolutionTM : composed of casein
• Serum from animals (Goat, horse, rabbit…)
The SmartBlockTM seems to go into tissue more easily. However, this step has to be optimized for each antibody and tissue type.